

Sweet Treat Valentine's Box by Amber Lawrence
Supplies:
- 12 x 12 piece of Red Lacquer Metallic cardstock
- red line sticky tape
- scoring board and tool
- scissors
- Transparency or Acetate sheet
- ribbon

Steps:
Cut Red Lacquer cardstock into these sized pieces:
1 – 6 ½ x 6 ½
1 – 3 x 3 15/16
2 – 1 7/8 x 6
Cut Transparency sheet to 4 1/6 x 11

On the 6 ½ x 6 ½ cut piece of Red Lacquer, score in on each side at 1 ¼”. Trim up on the short score lines on each of the four corners. Fold on all the score lines and adhere “tabs” with sticky tape. This is the base of the box.


To create the dividers inside the box, first score the 3 x 3 15/16 piece. On the 3” side, score at ½ , 1 ½, and 2 ½”. Fold on each score line and create a mountain fold. Use sticky tape to glue the peak together.


Next score each of the 1 7/8 x 6” strips. On the 6” side, score at 2, 3 and 4”. Make more mountain folds using the score lines and adhere them tightly with sticky tape.

Connect the dividers by sticking together the center divider and each side divider. Insert the complete divider into the box.


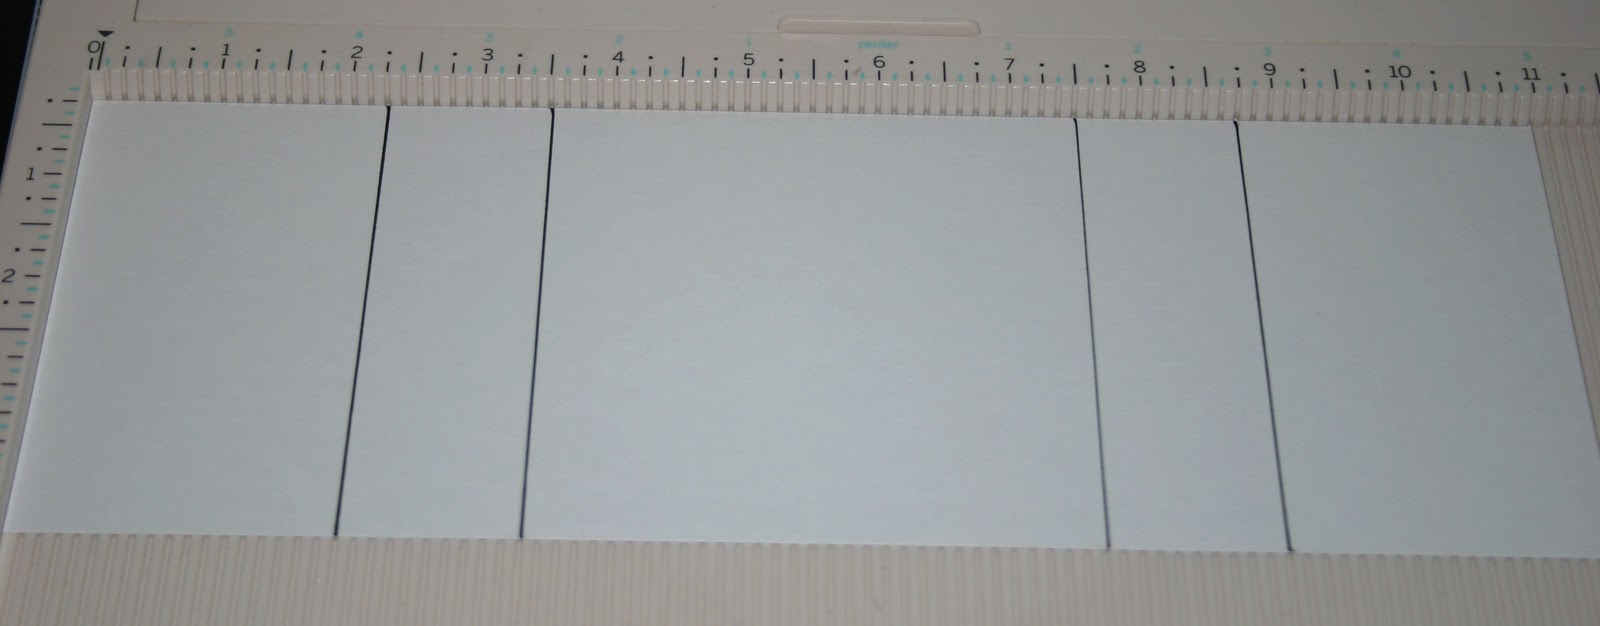
To make a transparent slip around cover for the box, create the folds on the transparency sheet. On the 11” side, score at 2 ¼, 3 ½, 7 ½ and 8 ¾ . I’m showing you the lines here on a white sheet because the transparency is well…. transparent. J
Carefully fold the transparency on all score lines, wrap it around the box and glue together on the bottom side using sticky tape.

Fill your newly created box with your Valentine’s favorite treats and spoil them! In my case, I used chocolate covered cherries from See’s Candy…. yummy! Add a tied ribbon for the finishing touch.


Just a quick note to let you know that a link to this post will be placed on CraftCrave today [29 Jan 12:00am GMT]. Thanks, Maria
ReplyDeleteAmber,
ReplyDeleteSuper cool. I'm going to find some transparency and give it a try. Perfect for any kind of small treats. Thanks for sharing with us.
Amber another great project and tutorial, love this and it can be used for s many different things. Love your blog!
ReplyDeleteI love this tutorial! Thanks so much for sharing it!!!!
ReplyDeleteThis is so adorable!
ReplyDeleteWhat a great gift to give.
Love it!!!!!
What a cool Tute! Makes me feel like "I could do that!"
ReplyDelete