

The supplies you'll need are as follows:
5 - A7 Brown Bag envelopes (I used 2 each Olive and Eggplant, and one Kraft color)
2 - 5 1/2" x 7 1/4" chipboard pieces
2 - 6 1/2" x 8 1/4" pieces of Brown Bag Tinted Text paper (I used cranberry)
5 - 4 3/4" x 7" pieces of Brown Bag Kraft 65# Cover weight paper for inserts
5 -4 1/4" x 6 1/4" assorted Brown Bag Tinted Text weight papers (I used cranberry, mushroom, blueberry and eggplant) for the photo mats
18" ribbon
1 - 6 1/2" x 10 1/2" strip of Brown Bag Kraft Cover weight paper
1 - 6 1/2" x 1 3/4" strip of Brown Bag Kraft Text weight paper
Scoring Board
Super Strong Adhesive - I used red line tape.
Assorted scraps for the tabs and patterned paper, if desired for inside covers. The text weight hand tinted papers also look very nice.
Step 1: Seal the envelopes and cut to 6 1/2". Be careful that you cut all your envelopes the same way so that the flaps are the same inside your book.
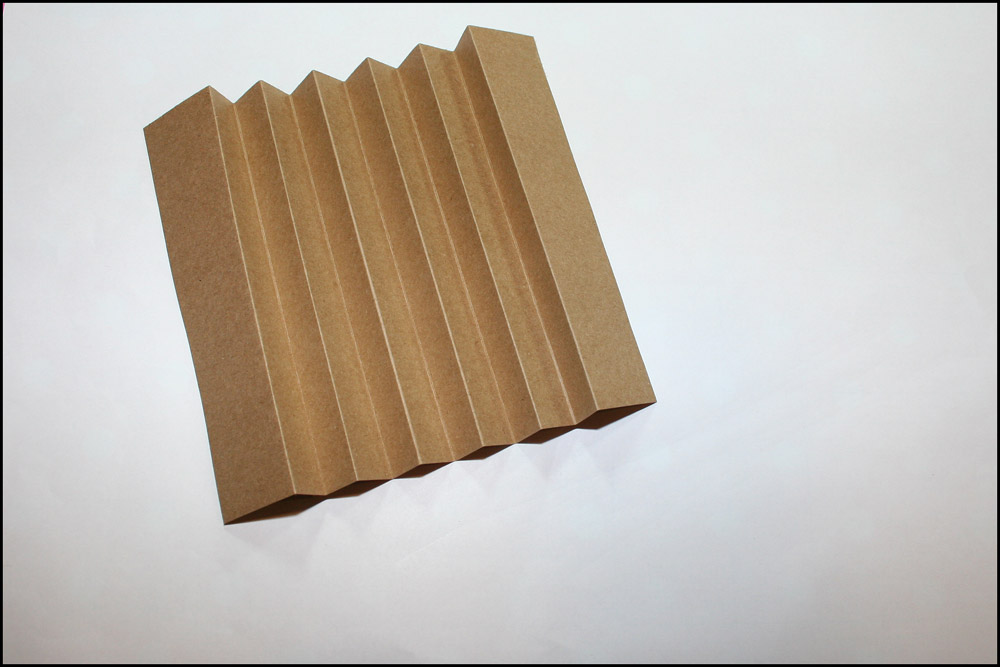
Step 2: Using a scoring board, score your 6 1/2" x 10 1/2" strip of Kraft Cover paper at 1 1/2", 3", 4 1/2", 6", 7 1/2". Flip the paper over, and score at 2 1/4", 3 3/4", 5 1/4", and 6 3/4". Accordion fold the strip using the score lines. Use a bone folder to really make sure the folds are creased well.
Step 3: Using red line tape or other adhesive, glue one 6 1/2" x 8 1/4" Tinted Text paper to one side of each of your chipboard covers. Turn over, and snip the edges of the text weight paper at the corners as shown. This helps the paper lay nicely on the back of the cover. Secure the edges to the back of the cover. **Don't adhere the inside cover yet! **

Step 4: Cut ribbon in half to 9". Secure the end of ribbon on the 7 1/4" side of the inside cover, about halfway. You only need about 1 1/2"- 2" secured inside the book, the rest you need to tie. Repeat with your second cover. Be sure to lay the covers next to each other to be sure the ribbons will be even.

Step 6: Adhere your first envelope, cut side up to the first "mountain fold" in your accordion. (The first fold facing upward. ) Repeat with your remaining envelopes.
Step 7: Cut out assorted tabs with a paper punch. Adhere to the top of the 5 - 4 3/4" x 7" pieces of Brown Bag Kraft 65# Cover weight paper as desired. At this time, you may want to add the 4 1/4" x 6 1/4" assorted Brown Bag Tinted Text weight papers for photo mats to these inserts. Slide one into each envelope.
Step 8: Score your 1 3/4" x 6 1/2" Cover weight paper at 5/8" and 1 1/8" (on the 1 3/4" side). Place your book with the spine facing towards you. Adhere one end of the paper to the inside of the first fold of your spine. Adhere the other end to the last fold of your spine. This helps the book lay flat and makes it easier to tie it shut with the ribbon.

Viola! You've just created an easy, fun accordion envelope album.
You can decorate or cover the envelopes, and you can add photos to the fronts and backs of the envelope inserts, as desired. I used 4 scrap pieces of 2 3/8" x 3 1/4" text weight papers to decorate the front of my album. I rounded the opposite corners of each piece and stamped them with VersaMark Watermark ink for a little texture. Then, I adhered them to the front of my cover.

Supplies Used: Chipboard, Brown Bag envelopes, Brown Bag tinted text paper in Mulberry, Olive, Kraft, Mushroom, Blueberry and Eggplant, Brown Bag cover weight paper in Kraft, Ribbon by Hallmark, Stamps and patterned paper by Close to My Heart, VersaMark Ink by Tsukineko.
Hope you have fun with this project! Happy Stamping!
Katherine


Love it!
ReplyDeleteKatherine,
ReplyDeleteI live very much. It could be a
great project.
Totally cute! You should teach a class on it. :)
ReplyDelete