
Hi all crafty peeps! I'm here to share with you a paper lantern made with Silhouette Cameo. I spotted this paper lantern cut file on Etsy and I couldn't resist it so I added it to my cart instantly. I used Classic Linen cardstock from CutCardStock to create this paper lantern. If you are having a party or any kind of celebration, you can make couple of these and string them up. I think it would look great for an outdoor party decoration!

The inner space of this lantern is actually pretty big so a regular tealight fits in the lantern nicely (I'd recommend using only LED tealight though). The linen cardstock is thick so it's suitable for creating 3D projects such as this.

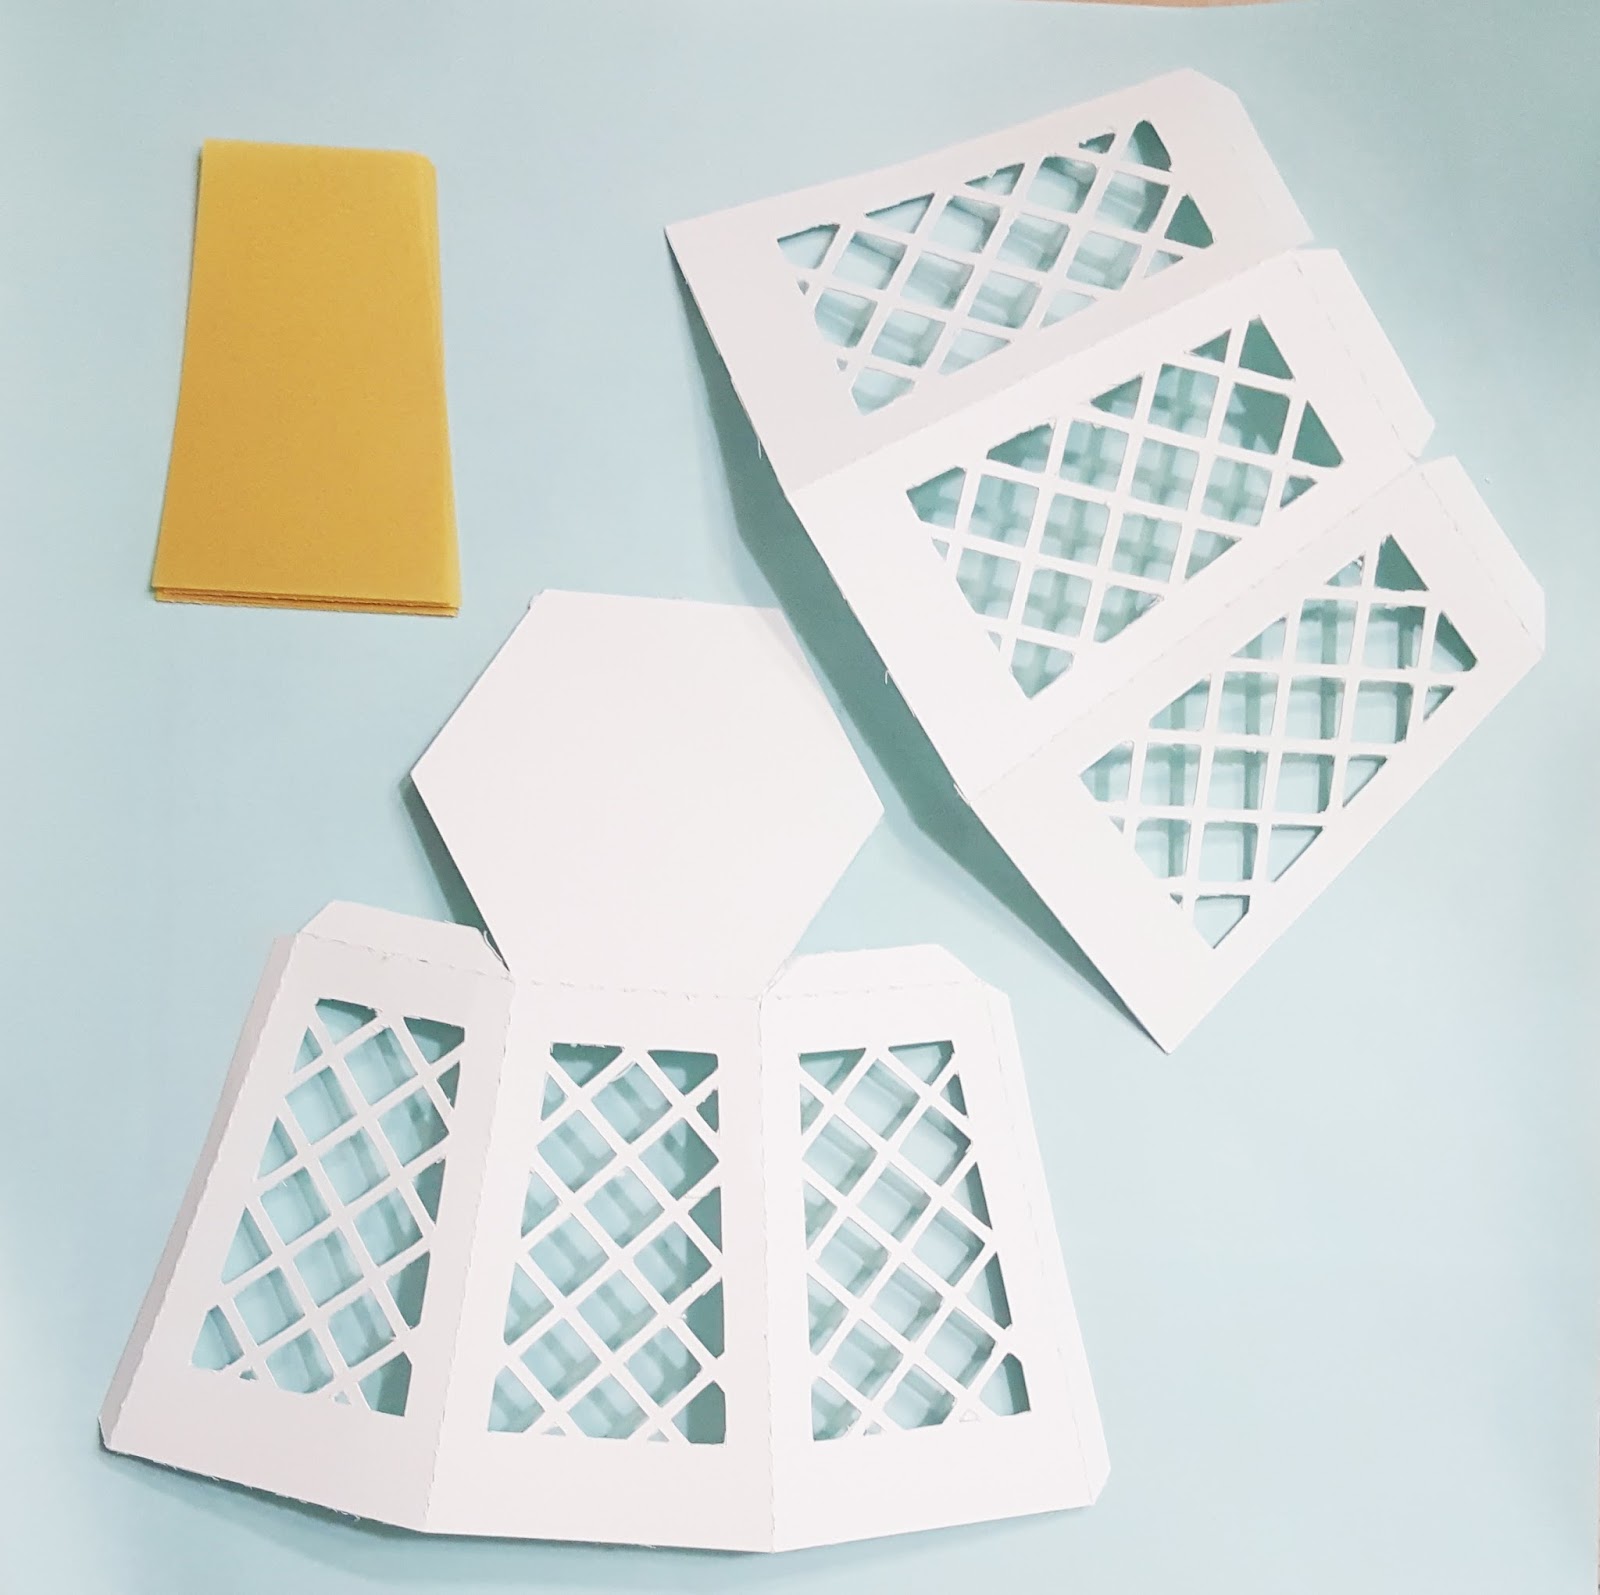
First I download all the files for this project and open them with Silhouette Designer Studio. You should receive three separate files that open in three separate windows as followings. Arrange the images so it cuts on your 8.5" x 11" cardstock. You will need to trace the images using the "Trace" tool to generate the cut lines for the cut images.


The top piece for the lantern.

These are the cutout pieces. Assemble pieces together using double-sided foam tape or strong liquid glue.
Scor-pal double-sided tapes are my new love!


Attach the window piece to the stand


Assemble the remaining pieces and you will get this gorgeous lantern!

I hope you find this project useful and inspiring! Will be back soon for my last post for my end-of-term with CutCardStock, I hope you have enjoyed my projects so far. Happy crafty days to you! - Alexia
Supplies:


Wow! This is amazing. Thanks for the clear steps.
ReplyDelete03E47
ReplyDeleteOkex Güvenilir mi
Çerkezköy Buzdolabı Tamircisi
Tekirdağ Evden Eve Nakliyat
Mamak Fayans Ustası
Maraş Evden Eve Nakliyat
Muş Evden Eve Nakliyat
Tekirdağ Boya Ustası
Yalova Şehirler Arası Nakliyat
Maraş Şehir İçi Nakliyat
D13C0
ReplyDeleteSakarya Evden Eve Nakliyat
Poloniex Güvenilir mi
Tunceli Lojistik
Antalya Evden Eve Nakliyat
Karabük Şehir İçi Nakliyat
Tokat Şehirler Arası Nakliyat
Bitmex Güvenilir mi
Paribu Güvenilir mi
Rize Evden Eve Nakliyat
50846
ReplyDeleteTekirdağ Cam Balkon
Kayseri Evden Eve Nakliyat
Etimesgut Boya Ustası
Bayburt Evden Eve Nakliyat
Çerkezköy Halı Yıkama
Trabzon Evden Eve Nakliyat
Zonguldak Evden Eve Nakliyat
Etlik Boya Ustası
Çerkezköy Cam Balkon
54BA2
ReplyDeleteBitcoin Para Kazanma
Coin Nedir
Coin Madenciliği Siteleri
Bitcoin Nasıl Para Kazanılır
Bitcoin Çıkarma
Kripto Para Nasıl Çıkarılır
Binance Sahibi Kim
Bitcoin Yatırımı Nasıl Yapılır
Coin Madenciliği Nedir
13CF1
ReplyDeleteBitcoin Kazma
Coin Üretme Siteleri
Coin Nasıl Çıkarılır
Coin Üretme
Binance Borsası Güvenilir mi
Bitcoin Kazma Siteleri
Binance Hangi Ülkenin
Kripto Para Kazanma
Mexc Borsası Güvenilir mi
A8AFD
ReplyDeleteBitcoin Nasıl Üretilir
Coin Kazma
Bitcoin Yatırımı Nasıl Yapılır
Coin Kazanma
Bitcoin Madenciliği Siteleri
Coin Çıkarma
Binance Kaldıraçlı İşlem Nasıl Yapılır
Bitcoin Nasıl Oynanır
Kripto Para Nasıl Oynanır
009E3
ReplyDeleteCoin Kazanma
Binance Nasıl Üye Olunur
Okex Borsası Güvenilir mi
Bitcoin Nasıl Alınır
Bitcoin Yatırımı Nasıl Yapılır
Coin Nasıl Oynanır
Coin Madenciliği Siteleri
Kripto Para Nasıl Oynanır
Bitcoin Nasıl Para Kazanılır
EDCE5
ReplyDeleteBulut Madenciliği Nedir
Paribu Borsası Güvenilir mi
https://resimlimag.net/
Bitcoin Üretme Siteleri
Coin Nasıl Kazılır
resimlimag.net
Yeni Çıkacak Coin Nasıl Alınır
Coin Nasıl Alınır
Coin Oynama
D2D00
ReplyDeleteBitcoin Para Kazanma
Bitcoin Para Kazanma
Coin Nedir
Coin Nasıl Çıkarılır
Bitcoin Hesap Açma
resimli magnet
Kripto Para Nasıl Oynanır
Coin Nasıl Üretilir
Bitcoin Giriş Nasıl Yapılır
FB4C1
ReplyDeleteBitcoin Madenciliği Nedir
Bitcoin Oynama
Bitcoin Kazma
Binance Hesap Açma
Bitcoin Mining Nasıl Yapılır
Coin Madenciliği Siteleri
Binance Ne Zaman Kuruldu
Coin Kazanma
magnet
CA7D2
ReplyDeleteBinance'de Kaldıraç Var mı
Kripto Para Nasıl Kazılır
Coin Madenciliği Nedir
Kripto Para Kazanma Siteleri
Kripto Para Oynama
Kripto Para Çıkarma Siteleri
Coin Nasıl Kazılır
Coin Kazma
Coin Madenciliği Siteleri
BA5BE
ReplyDeleteResimli magnet
EF8E9
ReplyDeletebitcoin ne zaman yükselir
filtre kağıdı
telegram kripto para kanalları
bitcoin hangi bankalarda var
bkex
binance referans kimliği nedir
sohbet canlı
bitcoin haram mı
en az komisyon alan kripto borsası
0FA79
ReplyDeleteApril 2024 Calendar
coinex
okex
canlı sohbet siteleri
referans kodu
huobi
probit
referans kod
January 2024 Calendar
CC902
ReplyDeletemexc
binance
bitcoin haram mı
en iyi kripto para uygulaması
bitget
bitcoin nasıl kazanılır
bitmex
bitexen
kraken
0474C
ReplyDelete----
----
----
----
----
----
----
----
matadorbet