

Hello, everyone! I've been a little obsessed with making 3"x 3" mini cards lately. I love being able to utilize every little scrap of paper so that nothing goes to waste. I've made quite a few and with the holiday season upon us, I thought that they would be great to package up and give as small gifts to coworkers, teachers, friends, etc.
Today I'm going to show you how I made these fun little card boxes. Mine are made to fit envelopes that measure 3-1/2" x 3-3/8" so you may need to resize the box depending on the size of your envelopes.

To make this project you're going to need:
- A piece of heavy cardstock (I'm using 130lb Classic Crest) that measures 7-1/8" x 7-1/8"
- The We R Memory Keepers envelope punch board
- A scoring tool
- Half of a 5/8" sticky back general purpose Velcro circle
- An adhesive of some sort. I'm using 1/4" double-sided tape

Slide the cardstock over to the 4" mark and punch and score.
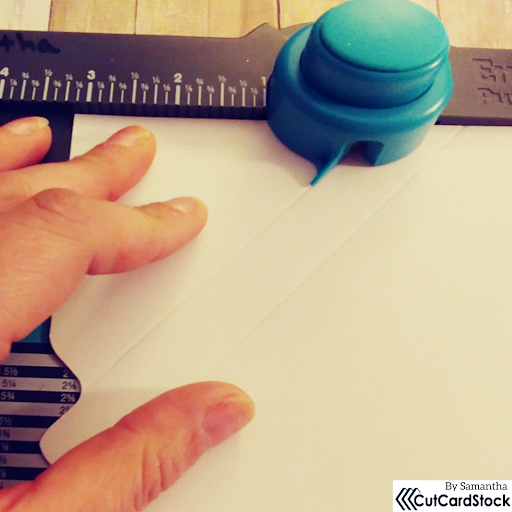
Turn your paper, line the blue guide up to the first score line and punch and score.

Slide the paper over to the second score line and punch and score.

When you're done you should have something that looks like this. I've drawn on my score lines to help you see what I'm doing a bit better. Don't forget to round the corners.

You'll see that one side of the box measures about 5" while the other side measures about 5-1/4".


Where the score lines intersect we've got four boxes. We're going to cut the top two boxes (I've shaded them) out.

Like so.

Next, we're going to cut the bottom boxes along the inner score lines up to the first score line. I've drawn arrows to show you where to cut and rectangles to show you where to stop.

Your bottom boxes will look like this.

Then I cut a small notch from each, angling what are now flaps.

I use a Velcro circle for my closure. You don't need to use this kind. You could use whatever you'd like as this is just my personal preference.

I put two halves together and cut them in half.

After folding all of my score lines I remove the backing from one side of the Velcro and stick it onto the very end of the top flap of the box.

I remove the backing from the other side of the Velcro and fold the top flap so that it meets the bottom flap, adhering the other side of the Velcro to the bottom flap.

Next, I put my double-sided tape onto the flaps. I've outlined my tape and added arrows so that you can see where to place it. I forgot to add it in the photo but you'll also want to put some tape on the right side flap as well.

Line your notched flaps up with the score lines and adhere.

Then adhere the side flaps.

Lastly, adhere the bottom flap.
I hope that you will try making one of these boxes yourself. If you'd like to see more of my work you can find me over on my:
Facebook: https://www.facebook.com/coykoicrafting/
Instagram: https://www.instagram.com/coykoicrafting/
Thank you so much for taking the time to check out my tutorial. Have a great day!
~Samantha


No comments
Thank you for visiting the CutCardStock blog! We appreciate your comments.