
Today, I want to share with you a tutorial on how to create a Copic color notebook. I used to get frustrated when I was at my favorite craft or art store only to see that Copics were on sale but I didn't have my color list--so no markers. I finally fixed that and made a color notebook that fits in my purse. Here's how you can make one too:
- Download color chart from here.
- Print chart with laser printer onto 60# White Mohawk Color Copy paper. If this is not available, print with an ink jet and have it copied at a local copy shop...otherwise the ink will run when Copic colors are applied.
- Cut pages into four equal sections and sort the stack into alphabetical order.

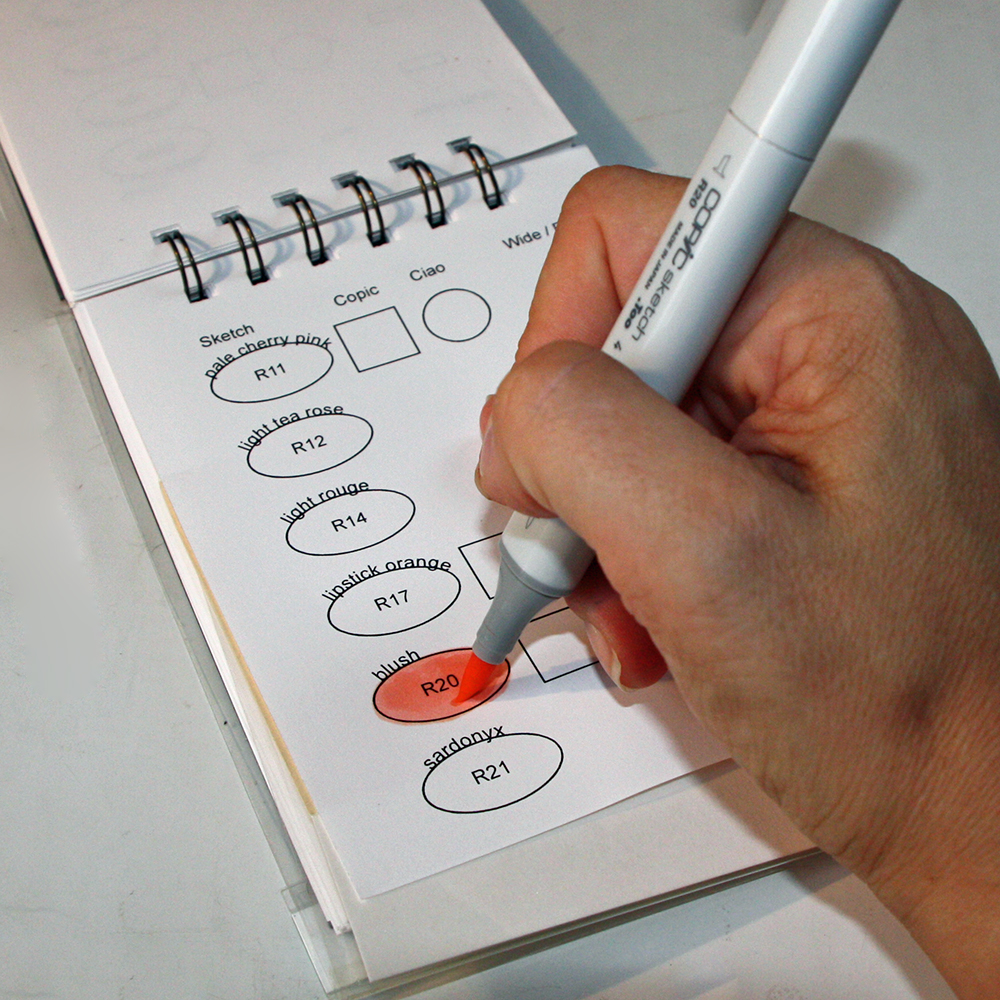
- Get out your Copic markers and color in the shapes that represent your inventory. Be sure to use a piece of scrap paper under the coloring page.
- Cut 2 mats of 105# Stardream Metallic Lapis Lazuli and one mat of 89# Curious Metallic Cryogen White, 4¼x5½"
- Cut patterned paper ½x4½" and ½x5½".
- Stamp cover image onto 89# Curious Metallic Cryogen White and color it. I created two so I could choose one for this book.


- Cut title letters from 89# Curious Metallic Cryogen White using Cricut. “copic” letters at 1½" and “colors” at 1".
- Before removing letters from Cricut mat, use markers to add polka dots to the “colors” letters.

- Glue title letters, image and patterned paper strip to 105# Lapis Lazuli
mat.

- Following manufacturer’s instructions (I used YourStory), laminate the
following using 4½x6½"
laminating sleeve:
the finished title page105# Lapis Lazuli mat
89# Curious Metallic Cryogen White mat and the patterned paper strip, ½" between
- Trim the extra laminate from the cover page so that there is a ⅛" border around it.
- Adhere
the back cover and the white "shield" using red line tape (⅛")

- Overlap the two pieces and adhere. Part of the back cover will be clear.
- Bind
the book with Zutter
Cut holes in the pages and the laminated covers
Place all pages, face up
Layer front cover, face up
Layer back cover, face down
Insert OWires beginning with book pages
Use Zutter to pinch binding
Bring the back cover around - Bend the white shield and tuck it under the front cover.
- Your book is now complete!!


Be sure to take the book along when you go to the craft store or are shopping online. This will prevent you from doubling up on markers.
When
you get new markers home, place a sticky note onto the white shield layer, slip it under the page that the marker number
is on and color it in...I love adding new colors to my book.


Bonus: At the back of the book, there are four “empties” for new colors that Copic brings to the market or for your own custom created colors.
Happy New Year to you all and may 2012 be exceedingly creative, Eli
Happy New Year to you all and may 2012 be exceedingly creative, Eli
Supplies
Paper 105# Lapis Lazuli, 89# Curious Metallic Cryogen White (CutCardStock.com); patterned paper, color copy paper
Colorants Memento Paris Dusk ink (Tsukineko), Sketch markers: BV11, B23, B41, B63, R85, RV11, RV23 (Copic)
Tools Printer, paper trimmer (Tonic), Bind-It-All and OWires (Zutter), YourStory Thermal Binding/Laminating machine, Cricut Cutter, DoodleType cartridge (Provo Craft)
Adhesives Red line Tape, PVA Glue


This is a great book and such a good idea to keep organized.... so many times I can't remember the colors I have!
ReplyDeleteThis comment has been removed by the author.
ReplyDelete