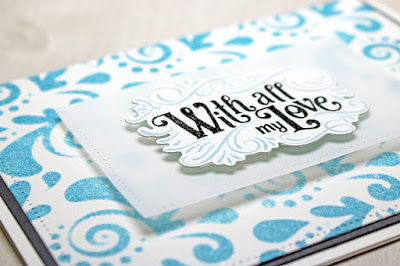
One of my favorite techniques is applying ink through a stencil, which is what I did to make the background for today’s anniversary card. I wanted it to be a simple card but fancy at the same time. What better way to do that than with a lovely swirly stencil?
This can get a bit messy - so to start out, find you a piece of scratch paper or a non-stick splat mat. Cut a 5.5 x 4.25-inch piece of Basis 110lb Card Stock and tape it down to work surface. If you are using a non-stick mat, I suggest artist's tape (the kind used to tape down watercolor sheets). It actually sticks to the non-stick surface. 😃
From there, tape your stencil (I used “Swirls and Dots," Simon Says Stamp) down and blend your ink in carefully from the sides. A mini ink blending tool or big sponge dauber works well here. The blue ink I blended over my card is Broken China Distress Ink. As I got closer to the center, I lightened the application so it would not be so bright under the vellum piece (more on that later).
Since it’s Distress Ink, I decided to spritz it with Sparkle Spray (Imagine Crafts). It reacts just the same as if you sprinkled it with water. I dabbed off the excess using a tissue before peeling up the stencil to let the cardstock dry. Don’t forget to clean your stencil after use!
In the meantime, I stamped the sentiment (Fancy Pants Sentiments, Papertrey Ink) on another piece of Basis 110lb Cardstock with Versafine Onyx Black ink. Then, I heat embossed the wording to help it stand out.
After the embossing powder was melted, I stamped the matching outer design from the stamp set in Soft Stone (Hero Arts Shadow Ink).
It drives me crazy when I stamp something all nice, then accidentally die cut it all wonky! I don’t want you to go through that frustration, so to die cut the sentiment just right, run a Post-It Note through your cutter first and then use it to position the die perfectly.
That way you can see where the edge will be cut and you can tape everything down to send through the die cutting machine.
Time to start putting it all together! I used a medium-sized die from a Pierced Rectangle die set (Avery Elle) to cut a small rectangle from some Curious Translucent Clear Cardstock, then the largest die from the same set to trim the edges of the inked cardstock.
I adhered the vellum to the center of the inked panel with two foam squares. They’re strategically placed to be out of sight behind the sentiment 😉
Then I added two more foam squares on top and attached the sentiment.
To put together the card, make a 5.5 x 4.25-inch card base out of another piece of Basis 110lb Cardstock. Add a 5.25 x 4-inch piece of Pop-Tone Black Licorice Cardstock with some glue tape to the front, followed by the finished panel.
Thanks for stopping by the blog today! Feel free to ask questions in the comments, and don’t forget that white and ivory cardstocks are on sale at the CutCardstock Store for a limited time!
❤️ Niki • cardstoq.com • @cardstoq (on Instagram, Pinterest & Twitter)


No comments
Thank you for visiting the CutCardStock blog! We appreciate your comments.